
GitHub Blog 만들기
본 포스팅에서는 Ruby와 Jekyll 설치 및 테마 적용에 대해서 설명한다.
- Jekyll과 Ruby 설치
- 테마 적용하기
Jekyll과 Ruby 설치
github repository가 정상적으로 생성이 되면 블로그처럼 꾸미는 작업이 필요하다. 모든 코드를 직접 작성하면 좋겠지만 만들어진 테마를 사용하면 간편하다.
ruby 설치
아래 사이트로 이동하여 ruby를 다운로드하고 설치한다.
*ruby
- If you don’t know what version to install and you’re getting started with Ruby, we recommend that you use the Ruby+Devkit 3.2.X (x64) installer.
무슨 버전을 사용해야할지 모른다면 권고하는 버전을 설치한다. 설치는 간단하다. next만 누르면 된다. 하지만, 아래 테마를 적용하다보면 오류가 날 수 있다. 테마에서 사용한 버전이 낮으면 버전을 다운그레이드 해줘야 한다.
 ruby 다운로드 및 install
이후에는 명령어를 좀 실행 해줘야 한다.
 ruby cmd 실행
1. git clone한 위치로 이동
사용자마다 clone한 위치가 다를텐데 위에서 생성한 repository를 클론한 위치로 이동한다. 이동한 다음 인코딩 명령어를 실행해서 인코딩을 한다. 그러면 “Active code page: 65001” 라고 결과가 나온다.
1
2
3
cd C:\PycharmProjects\gitpage\queen1052.github.io
chcp 65001
Active code page: 65001
2. jekyll 및 bundle설치
gem 명령어로 패키지를 설치하고 bundle install을 한 다음 bundle exec jekyll serve 명령어로 서버를 실행된다. 서버가 실행되면 http://localhost:4000/ 로 접속 가능하다. 테마가 없기 때문에 아무것도 없는 빈 페이지이다.
1
2
3
4
5
6
7
 gem install jekyll bundler

 gem install webrick

 bundle install

 bundle exec jekyll serve
3. theme 적용
theme를 적용하는 방법은 두 가지가 있다. theme가 git에 있다면 git에서 fork하고 pull을 해도 되고, zip 파일을 로컬 repository에 압축해제 하고 수정해서 commit&push 해도 된다.
fork를 한다면 기존 생성한 repository를 삭제하고 theme를 fork할 때 repository 이름을 id.github.io로 생성한다. 그리고 pull 해서 로컬에서 코드 수정 후 commit&push 하면 된다.
zip 파일을 사용한다면 clone한 위치에서 다운로드한 theme zip 파일을 압축 해제 한다.
이후 bundle install을 하고, 서버를 실행한다. 패키지가 없다면 오류가 날텐데 gem 명령어로 설치를 해주고, 필요한 패키지는 Gemfile에 등록을 해준다. 이때 버전이 안맞으면 오류가 발생하는데 오류를 잡아줘야 한다. 패키지 버전이 안맞을 수도 있고 ruby 버전이 안맞을 수도 있다.
1
2
3
 bundle install

 bundle exec jekyll serve
4. 블로그 기본 설정
블로그 기본 설정은 _config.yml 에서 설정할 수 있다. 테마마다 설정이 다르고, 설정은 내용이 많아서 열어서 확인하고 본인에게 맞게 수정하면 될 것 같다. theme 제작자의 안내가 있을 수도 있는데, 설명을 잘 읽고 따라하면 된다.
themes 다운로드
jekyllthemes 에는 무료로 사용할 수 있는 많은 테마들이 있다. 해당 블로그도 jekyllthemes에서 다운로드해서 적용 했다. 아래 사이트에서 마음에 드는 테마를 선택해서 적용하면 된다.
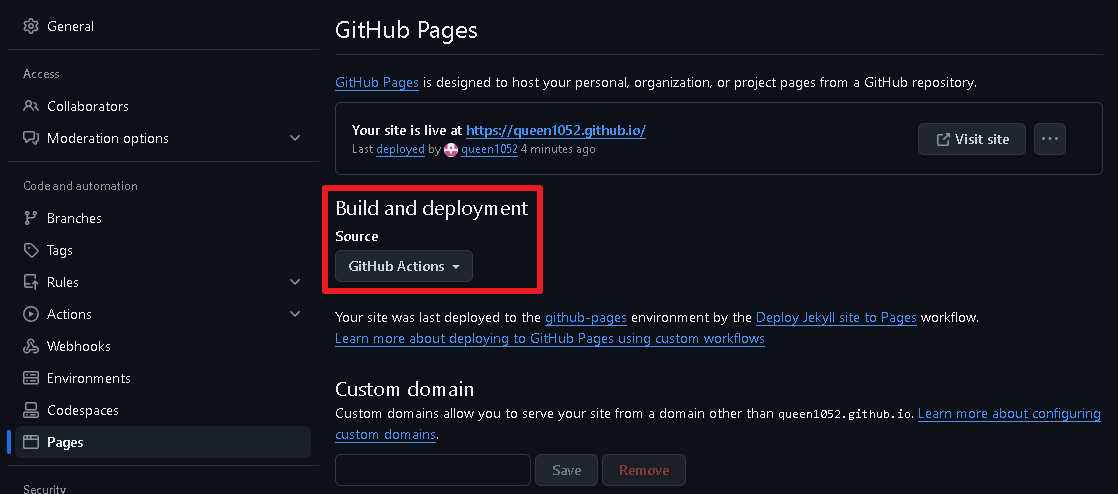
5. Jekyll deploy
theme 마다 ruby 버전의 영향을 받는다. 오류가 나면 버전을 잘 맞춰줘야 한다.
theme를 deploy하는데 계속 오류가 나서 찾아보니 Build and deployment 를 GitHub Actions로 해야한다고 한다.
jekyll.yml 이 생성되는데 여기서 ruby 버전만 잘 맞춰주면 문제없이 deploy가 된다.
 GitHub Action
1
2
3
4
5
6
7
8
9
10
11
12
13
14
15
16
17
18
19
20
21
22
23
24
25
26
27
28
29
30
31
32
33
34
35
36
37
38
39
40
41
42
43
44
45
46
47
48
49
50
51
52
53
54
55
56
57
58
59
60
61
62
63
64
# This workflow uses actions that are not certified by GitHub.
# They are provided by a third-party and are governed by
# separate terms of service, privacy policy, and support
# documentation.

# Sample workflow for building and deploying a Jekyll site to GitHub Pages
name: Deploy Jekyll site to Pages

on:
  # Runs on pushes targeting the default branch
  push:
    branches: ["main"]

  # Allows you to run this workflow manually from the Actions tab
  workflow_dispatch:

# Sets permissions of the GITHUB_TOKEN to allow deployment to GitHub Pages
permissions:
  contents: read
  pages: write
  id-token: write

# Allow only one concurrent deployment, skipping runs queued between the run in-progress and latest queued.
# However, do NOT cancel in-progress runs as we want to allow these production deployments to complete.
concurrency:
  group: "pages"
  cancel-in-progress: false

jobs:
  # Build job
  build:
    runs-on: ubuntu-latest
    steps:
      - name: Checkout
        uses: actions/checkout@v4
      - name: Setup Ruby
        uses: ruby/setup-ruby@8575951200e472d5f2d95c625da0c7bec8217c42 # v1.161.0
        with:
          ruby-version: '2.7.7' # Not needed with a .ruby-version file
          bundler-cache: true # runs 'bundle install' and caches installed gems automatically
          cache-version: 0 # Increment this number if you need to re-download cached gems
      - name: Setup Pages
        id: pages
        uses: actions/configure-pages@v5
      - name: Build with Jekyll
        # Outputs to the './_site' directory by default
        run: bundle exec jekyll build --baseurl "$"
        env:
          JEKYLL_ENV: production
      - name: Upload artifact
        # Automatically uploads an artifact from the './_site' directory by default
        uses: actions/upload-pages-artifact@v3

  # Deployment job
  deploy:
    environment:
      name: github-pages
      url: $
    runs-on: ubuntu-latest
    needs: build
    steps:
      - name: Deploy to GitHub Pages
        id: deployment
        uses: actions/deploy-pages@v4
Comments powered by Disqus.